
TL;DR
Most noise and echo in a closet come from reflections and leaks. Moving your rig away, sealing gaps, and placing absorption correctly makes the biggest difference. You don’t need a full renovation—just smart tweaks.
Ever tried recording vocals or streaming in a tiny closet? You might think a bunch of foam panels will solve everything. But the real magic happens when you understand where sound comes from—and how to control it at its source.
This guide shows you how to optimize your closet setup. From dampening reflections to sealing gaps, you’ll learn the smart ways to turn a cramped space into a professional-sounding booth—without tearing down walls or overdoing it. Learn more about acoustic dampening.
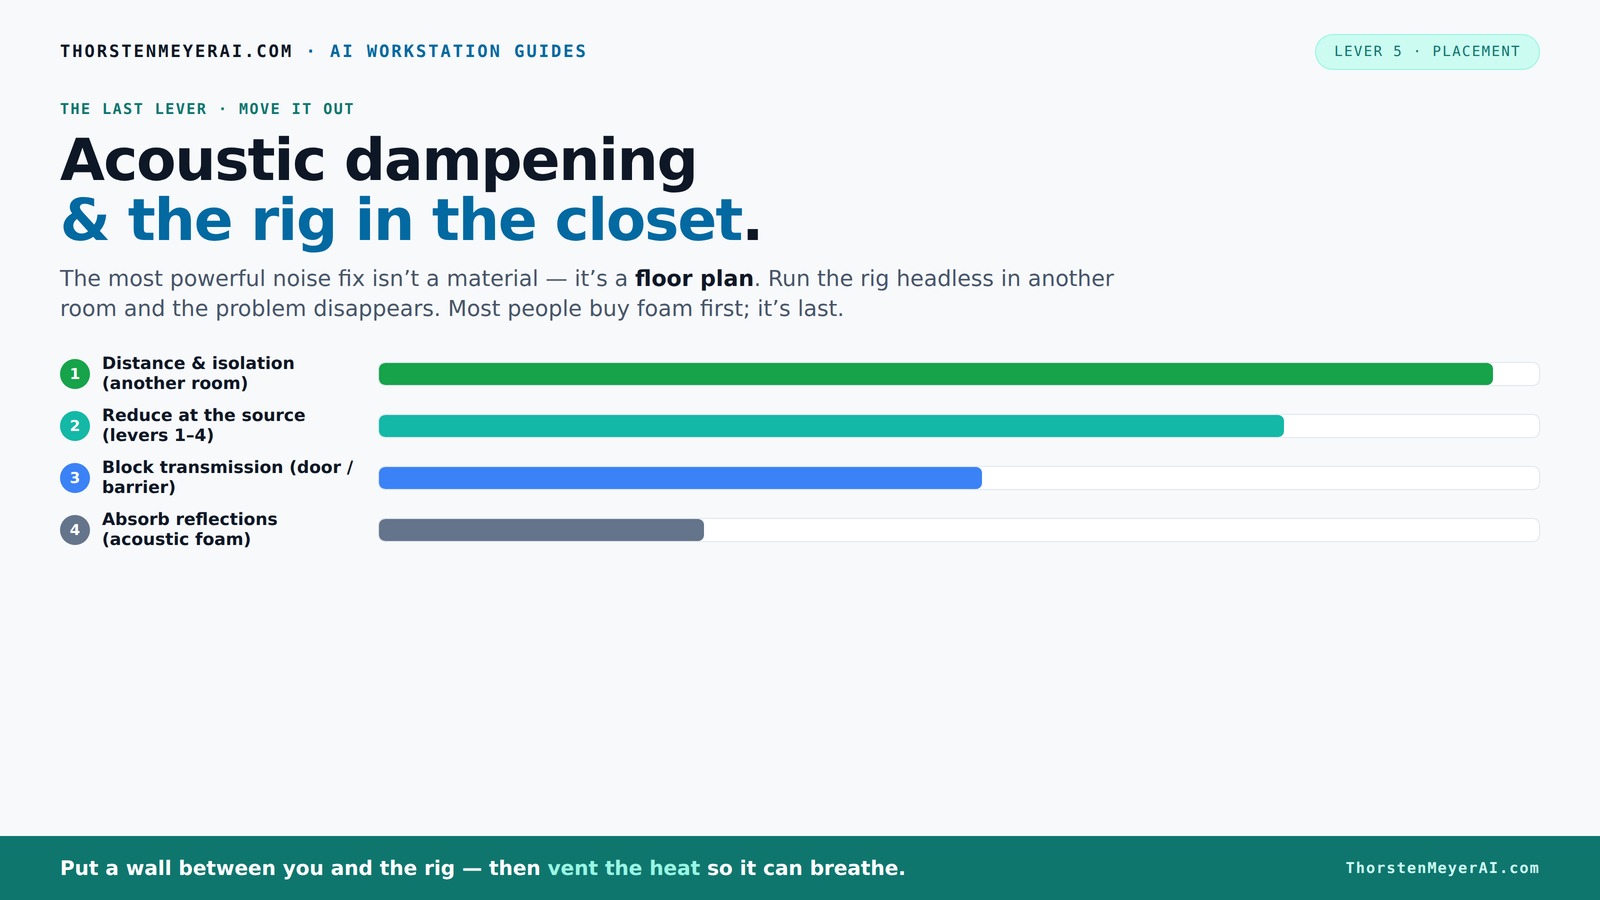
Acoustic dampening
& the rig in the closet.
The most powerful noise fix isn’t a material — it’s a floor plan. A rig you can’t hear because it’s in another room beats any amount of foam. Tap the approaches in Part 1 to see what actually works.
(another room)
(levers 1–4)
(door / barrier)
(acoustic foam)
Contain the noise, not the heat
Key Takeaways
- Prioritize sealing gaps and leaks before adding absorption or panels.
- Place panels at first reflection points—side walls and ceiling—for maximum clarity.
- Manage low frequencies with bass traps in corners; thicker panels help with bass buildup.
- Use affordable DIY fixes like blankets, rugs, and foam to improve sound without breaking the bank.
- Ensure proper ventilation when placing a rig in a sealed closet to prevent overheating.

Focusound 52 Pack Acoustic Foam Panels 1" x 12" x 12" Sound Proof Foam Panles Soundproofing Noise Cancelling Wedge Panels for Home Office Recoding Studio with 300PCS Double-Side Adhesive
- Soundproofing Design: Triangular grooves for noise absorption
- Includes Adhesive Tape: 300pcs double-sided adhesive for easy installation
- Easy Shape Recovery: Soak in water to restore shape within 48 hours
As an affiliate, we earn on qualifying purchases.
As an affiliate, we earn on qualifying purchases.
Why a 'Rig in the Closet' Can Work Better Than You Expect
Putting your computer rig or mic in a closet isn’t just a space-saver; it can silence most of the noise. Since your voice or mic is the main sound source, moving the noisy machine out of your earshot cuts down on distractions. Plus, a closet’s small, reflective surfaces can actually help you control echoes if treated right.
Imagine a streamer who keeps their gaming PC in a closet behind a thick door. The noise is muffled, and the reflections are controlled with a few panels—game sound and voice clear as a bell. This setup proves that the closet isn’t just a storage space but a tool for better sound.
Acoustic Dampening vs. Soundproofing: What You Really Need
Acoustic dampening and soundproofing aren’t the same thing, though they get mixed up a lot. Dampening is all about reducing echo and reflections inside your closet—making your sound clearer. Soundproofing blocks sound from leaking out or coming in, which is a whole different ballgame.
In a small space like a closet, dampening is often the most practical focus because it directly improves how your recordings sound—reducing muddiness and echo. Soundproofing, on the other hand, involves adding mass and sealing gaps to prevent sound from escaping, which can be more costly and complex. For most home setups, balancing both—by dampening internally and sealing gaps externally—offers the best compromise. But understanding their differences helps you prioritize your efforts and avoid overcomplicating your project.
Where to Place Acoustic Panels for the Best Voice Quality
Placement is everything. Acoustic panels should target the first reflection points—spots where sound bounces directly from your mic to the walls. Using a mirror to find these points is a practical method: sit in your recording position, hold a mirror against the wall, and identify where reflections bounce back toward your mic. Covering these points with panels prevents sound from bouncing into the microphone, which can cause muddy recordings. Find out more about panel placement.
In a closet, focus on the side walls near your microphone and the ceiling above. Covering about 20–40% of these surfaces with 2-inch thick panels strikes a balance—enough to absorb mid and high frequencies without overly deadening the space. Thicker panels can help tame lower frequencies, which tend to build up in small rooms and cause a boomy sound. For example, a YouTuber in a closet placed panels precisely at these reflection points and added a bass trap in the corner; the clarity of their recordings improved dramatically because the sound waves were effectively controlled at critical points.
How to Reduce Reflection and Echo in a Tiny Space
Reflections bounce around a small closet like pinballs, creating echo and muddiness that can obscure your voice. To tame this, focus on treating surfaces that reflect sound—walls, ceiling, and even the door—since these are the main culprits in echo generation. But beyond just adding panels, it’s important to understand the tradeoffs: over-treating can make the space sound unnatural or too dead, while under-treating leaves echoes that muddy your recordings. See tips for reducing echo.
Here are practical steps with their implications:
- Cover the wall behind your mic with a reflection filter or a thick blanket—this reduces rear reflections that directly hit your microphone, improving clarity.
- Place foam panels at the first reflection points on side walls—these are critical spots that bounce sound back into the mic. Proper placement ensures your voice is captured cleanly.
- Use a soft rug or carpet on the floor—this prevents sound bounce from the ground, which can contribute to muddiness, especially in small spaces.
- Consider hanging a blanket or acoustic curtains over the door—this minimizes sound leaks and reflections from outside the closet, but be aware it can also reduce ventilation, so plan accordingly.
For instance, a podcaster layered a thick rug, a reflection filter, and a blanket over the door. The result? A warm, focused vocal tone with minimal echo, showing how each element contributes to a cleaner soundscape. But remember, each addition affects the room’s acoustic balance—it's about finding the right mix for your space and needs.
Controlling Bass Buildup in Small Closets
Low frequencies love small, enclosed spaces—they bounce around and create a boomy sound that can obscure the clarity of your voice. Bass buildup is a common problem because small rooms amplify these frequencies, leading to a muddy, indistinct recording. Bass traps are essential in these scenarios, especially in the corners where low frequencies tend to accumulate. Learn more about controlling bass buildup.
For example, a streamer added DIY bass traps to their closet’s upper corners. The bass response became more controlled, reducing boominess by nearly 50%, and making the voice sound richer and more professional. The key tradeoff is that bass traps can be more expensive and require thoughtful placement—targeting the corners and upper areas maximizes their effectiveness. Ignoring low-frequency issues can leave recordings sounding muffled or boomy, undermining overall sound quality. Proper bass management enhances clarity, especially when combined with general absorption of higher frequencies. Learn more about managing low frequencies.
Budget Tricks: Cheap and Easy Ways to Improve Your Closet Studio
You don’t need a full renovation to get good results. Simple, affordable fixes can dramatically improve sound quality by addressing reflection and leakage issues without breaking the bank: Discover budget-friendly acoustic tricks.
- Use blankets or moving pads to cover walls and gaps around the door—these reduce reflections and outside noise ingress effectively.
- Place a thick rug or carpet on the floor—this absorbs bounce and prevents sound from reflecting off hard surfaces.
- Stack books or use DIY panels made from foam or egg crate foam—these can be strategically placed to target reflection points and add mass.
- Seal gaps around outlets and vents with acoustic sealant or weatherstripping—these small leaks can significantly impact sound isolation.
One creator wrapped their closet door with a dense moving blanket, which not only muffled external noise but also improved internal acoustics. Such low-cost solutions often provide surprisingly noticeable improvements, making your space more conducive to quality recordings without extensive investment. The key is understanding where to place these items for maximum effect and balancing reflection control with ventilation needs.
Common Mistakes That Sabotage Your Closet Sound Setup
Avoid these typical pitfalls that can undermine your efforts:
- Overcovering with panels—adding too many can deaden the room excessively, making recordings sound unnatural or too "boxy." Balance is key; too much absorption kills the room's natural liveliness.
- Sealing gaps but neglecting reflection control inside the space—this leaves echoes that muddle your recordings despite good seals.
- Using only foam on the walls without sealing or bass trapping—this can lead to a space that looks treated but still suffers from low-frequency issues and internal reflections.
- Placing the mic too close to reflective surfaces—this causes comb-filtering and phase issues, degrading sound quality. Optimal mic placement involves some distance from reflective surfaces and using reflection filters.
- Ignoring ventilation—your rig will overheat fast in a sealed closet, which can damage equipment and reduce performance. Incorporate ventilation solutions that do not compromise acoustic integrity.
For example, one beginner added dozens of panels but left gaps in the door and didn’t treat the ceiling. The echo persisted, and the voice sounded muffled. Targeted placement and balanced treatment are more effective than simply piling on panels. Always consider the room as a whole—sound leaks, reflections, and ventilation all matter.
The Final Word: How to Make Your Closet Studio Sound Clean and Quiet
Focus on sealing leaks, placing absorption strategically, and ensuring proper ventilation. By combining these tactics, you turn a tiny, noisy closet into a clean, quiet space for recording or streaming. Each element plays a role: sealing reduces external noise ingress, absorption manages internal reflections, and ventilation prevents overheating and maintains equipment longevity.
Remember, the biggest wins come from reducing sound transmission and controlling reflections—these are the core principles that improve clarity and reduce muddiness. You don’t need a big budget—just targeted, smart tweaks that address your specific space and needs.
Imagine a cozy closet with perfect sound—no echo, no outside noise, just your voice shining through. Achieving this balance is about understanding your room’s acoustic behavior and making strategic improvements. With patience and careful placement, your closet can become a professional-grade studio space that costs less and sounds better than you might expect.
Frequently Asked Questions
Is acoustic treatment the same as soundproofing?
No, they address different issues. Acoustic treatment reduces echo and reflections inside your space, while soundproofing blocks sound from entering or leaving. For a closet studio, focus on dampening reflections and sealing gaps for best results.
Where should I place acoustic panels in my closet?
Start with the first reflection points—side walls near your mic and the ceiling above. Use a mirror to find these spots. Cover about 20–40% of these surfaces with panels, focusing on areas that bounce sound back into the mic.
Do I need bass traps in a closet?
Yes, especially if you notice boomy, muddy sound. Place thick bass traps in the upper corners to absorb low frequencies and prevent buildup. Thick panels help tame the bass and bring clarity to your recordings.
How many panels do I need for a closet studio?
It depends on your goal and space size. For typical small closets, covering 20–40% of the walls and ceiling with 2-inch panels is a good start. Focus on first reflection points and corners for the best results.
Can blankets or moving pads work as cheap acoustic treatment?
Absolutely. Wrapping blankets over walls, doors, and vents can significantly reduce reflections and outside noise. They’re an affordable way to improve sound quality without permanent changes.
Conclusion
Your closet can become a surprisingly effective recording or streaming space. The secret lies in smart placement, sealing leaks, and controlling reflections. It’s not about overbuilding—it's about thinking strategically and making small, impactful changes.
Picture a quiet, warm corner where your voice sounds clear and professional. That’s the power of a well-treated closet—an upgrade that costs less than you think, with results that speak for themselves.